Showing posts with label vintage. Show all posts

Saturday, 24 September 2016

How to Make a Circle Skirt | Free Tutorial


Afternoon all! I hope you've all had a lovely week! As promised, here is part two of my circle skirt tutorial. If you have not yet drafted your pattern and want to make this, go here and follow my tutorial. Once you've done this you're more than welcome back into the loving sewing embrace of this tutorial. (That was an odd sentence...) 

What You Will Need

  • 3m - 4m of 45" width fabric, or 2m - 3m of 60" width fabric. (I'd go with a medium weight cotton, and steer clear of stretchy fabrics)
  • 20cm zip
  • A hook and eye (optional, and dependent on your zipper skills)
  • Corresponding thread
  • 1m of medium to heavy weight fusible interfacing
  • Pattern pieces from previous tutorial


Let's just remind ourselves what we ended up with after we made our pattern pieces:
We have piece 1, which needs to be cut on the fold; pieces 2 and 3 which are cut from the same pattern piece, and the waistband which is also cut on the fold.

Layplan and Cutting
1. How you devise your layplan depends on what the width of the fabric is. My sister's circle skirt was 45" width, and so the layplan looked like this. 45" width fabric is more common when it's the pretty patterns you're likely to want to use for a circle skirt, so hopefully this helps!
The waistband got cut from a length of scrap after this. Whether or not this works for you depends on your waist size and the length of the skirt, so you may have to alter things if it's not fitting.


However, the one I made for this tutorial was 60" width and I had 2.5m of it, which actually made life less complicated (and more economical).I folded it in half length ways so that piece one could be cut on the fold, and piece two could be pinned and cut to produce two pieces of fabric. Like so:


Cut all the pieces out (my favourite bit!) and you're ready to sew!

Sewing the Skirt

1. Sew the front skirt to the back skirt pieces at the side seams with a 1.5cm seam allowance. I sewed my skirt and my sister's using French seams, which gives it a nicer finish but it isn't necessary! Leave the centre back seam unstitched at this point.


Press open the seams on each side.

2. Affix the fusible interfacing to your waistband. My mum calls this iron on Vilene. Resist the urge to sing Iron-On Vilene to the tune of 'Come on Eileen'.


Step 3
3. Along the length of your waistband, fold up and press 1cm from the edges, like you're hemming it. Do the same on the other side. Now fold the waistband in half along the width and press, so each hem is meeting.

4. Fold the waistband again gently lengthways and give it a wee press to find the centre. Match the centre of the waistband up with the centre fold of the front skirt, right sides together, and pin from the centre to each end of the waist of the skirt.


Step 4
Step 4


5. Now, stitch the waistband onto the skirt right sides together along the pressed fold line. Take this slowly and steadily, as waistbands are a pain to take out and redo if they're wobbly.


6. Press seam up towards the rest of the waistband (I originally wrote wardrobe, brain fart...).


7. So, this was the first circle skirt I made where I inserted zip before I finished the waistband. I was a bit sceptical but thought it might eliminate some difficulties I've had with zips before, and to my delight it did! It's the best zip insertion for me yet and I am so happy it was on a skirt I was making for someone else!

Place the zip where you want it and then mark where the end of the zip is onto the centre back seam. Once this is done you want to sew the centre back seam from the hem up to this mark using a 1.5cm seam allowance. Once this seam is stitched you can start inserting your zip.

Insert the zip with the top of the zipper tape just going past the fold of the waistband. This way it'll be sewn to the very top of the waistband and you won't actually need the hook and eye. If you find you've done it too low though and there's a gap at the top then just pop a hook and eye on and it won't make a great deal of difference.


Tack your zip first in different coloured thread so that you can easily take these stitches out once the machine stitches are done. 
 My only tip for zips is to tack them first, for all other advice with them go to YouTube or give it a Google, as they rarely go so well for me!

8. Now, with the zip in fold the waistband over so that it meets your first waistband seam and hides it. Pin it in place.


 Now, top stitch the waistband in place, either along the first seam so no stitches are visible or as a neat top stitch about half a centimetre from the bottom of the waistband. I did the latter on this skirt and as it's level all the way along it has a nice effect!


Hemming

Hemming a circle skirt is notoriously difficult as the whole hem is on a curve and tricky to make the same length all the way around. In order to do this correctly I have tried many things, I've put it on Matilda the mannequin and measured and pinned meticulously for hours all the way around; my mum and I have fashioned together a sewing plumb line out of a box of staples and a scrap of fabric (doesn't work); I've laid down on the floor and looked right up the skirt with a spirit level. Finally, the most simple technique worked. I make life difficult for myself.

Get out your ironing board and rotate the skirt around, measuring the desired length from the waistband to the hem all the way round, plus 1cm for the hem. Work round, marking as you go, then go round again folding, pressing and pinning the hem in place, making tiny snips into the hemming allowance to reduce the bulk.


THEN! GET A HEMMING FOOT! This was the first time I'd ever used mine and it made a beautifully level hem that didn't gather or anything. Seriously, I was blown away! Keep to a 1-1.5cm hem, as too thick a hem will affect the way it hangs.


And with that, you're done! I add in this little label to the things I make for other people, until I get Sew Well Travelled ones made that is.


If you use this tutorial to make your own circle skirt please send me pictures on my social media profiles, which are linked at the top of the blog. OR, if you really don't want to make your own, visit my Etsy shop where you can commission me to make one for you (for a very good deal, taking into account the cost of fabric and the time it takes!)

Let me know how you get on, and until next time lovelies!

Kat xx

Sunday, 18 September 2016

How To Draft Your Own Circle Skirt | Free Tutorial


Evening all! 

So this year I have taught myself how to draft my own patterns in a way that makes sense to me, which is pretty amazing! So as this was requested by a fellow seamstress I thought I'd do a tutorial on how I draft and make my circle skirts. This is part 1, where I will focus on drafting the pattern pieces using your own measurements. Part 2 will come later this week and will be all about making the actual skirt! So let's jump right in...

What You Will Need:
Pattern drafting paper (or A3 paper and a good glue stick)
A ruler (I had to edit this post as I actually forgot to include this!)
A set square or a protractor
A calculator (unless you're excellent at dividing by decimals in your head)
A large table or area of hard floor
Patience and flexibility
About 1 hour


Optional extras include a cat who doesn't like your attention being on anything but him.

STEP 1. Measure
You need to take your waist measurement and the desired length of the skirt. I take the waist measurement snugly so I can just fit 2 fingers between the tape measure and the waist. This way it will hug the body when worn and accentuate your waist. To take the length of the skirt, measure from the point of your waist down to where you want it to stop. For the one I was making it was 67cm, which stops at my friend's knee. But obviously, everyone is different!


STEP 2. Draft

1. So I don't use pattern paper or anything for circle skirts, since the pieces are so large it would cost a fortune. Instead I always have a pad of A3 paper on hand and stick about 9 sheets together like so:
People laugh at me when I ask where my "good" glue stick has gone. Some glue sticks are just better than others. 
2. Once all the pieces are stuck together you need to draw a right angle in the corner, it doesn't matter which one!


I knew taking Standard Grade Graphic Communication would come in handy one day!
3. You now have to do some maths magic, and don't get too excited when I tell you that you get to use pi. Divide your waist measurement by pi (or 3.14 if you don't have a pi button) and then by 2. This will give you the radius of the circle which will form the waist of the skirt. I usually round it to 1 decimal place, but I don't think it would cause too much difficulty if you rounded it to the nearest whole number.

4. Draw from the point of the right angle straight lines which are the length of your radius. (This was a really difficult instruction to phrase... see photo below)

Label the right angle A, the vertical line B and the horizontal line C

Like you're drawing a triangle basically but don't join the points to make it one. 

5. You then need to take your radius and mark a series of points from your right angle between the space B to C. This will form a curve.


Join the dots (YAY!) and you have your waist for your skirt (DOUBLE YAY!).

6. Now draw a straight line from points B and C - this line should match your skirt length with about 2cm added for seam allowance. Label your new points D and E. 

You should now have a corner called A; waist labelled BC; a straight line BD and another CE.

7. Repeat the join the dots interval measurement trick that we did with the waistline to create a curved hem for the skirt. 

8. Now add a 1.5cm seam allowance to line CE. You can do it from point A to E if you want but we don't actually need to talk about A anymore. A can go.

9. Add a fold line to line BD like this one here:
10. Cut out and copy this exact pattern onto another piece of pattern paper, but with adding the 1.5cm seam allowance to BOTH lines (CE and BD) this time. 
If it helps you keep track, the first pattern piece we made (with the fold line) can be labelled front skirt and piece 1; and the second pattern piece can be labelled back skirts and pieces 2 and 3. Pieces 2 and 3 are cut by cutting 2 pieces of fabric but not on the fold, as we need that centre back seam for the zip.

STEP 3: Make the waistband:
Take your original waist measurement and add 8cm to this. This is because of stuff to do with pi which I don't fully understand but intend to work out! Draw a rectangle which is this measurement divided by 2 (in my case 87cm + 8cm = 95cm/2 = 47.5cm ) by 12cm. You can change the 12cm around if you want a wider or narrower waistband, I just think 12cm is a nice width). Add a fold line to one of the shorter sides to the rectangle so that you can cut this on the fold.


And once you've done all of that, you should be left with all the pieces you need to make your very own circle skirt which *should* fit you perfectly!


Be sure to check my blog later in the week on part 2 of this tutorial, which is when we will make the actual skirt using these pattern pieces! Til then, happy drafting!

Lots of love,

Katharine

Wednesday, 31 August 2016

The 1950s Pattern Challenge


Sometimes there just isn't the perfect pattern for what you have in mind, that's what myself and my beautiful sister found anyway. As mentioned in my previous post, she had come home with an idea in mind of the shirt and skirt ensemble that she wanted and challenged me to create it for her. As you will have seen in my last post, pattern drafting/hacking was completely new to me and I sat staring at the 'pattern drafting paper' (I'm too stingy for the real stuff, so use greaseproof instead) for probably several hours in total. I created my own instructions and I pinned and tucked on a mannequin for quite some time before I even got up the guts to cut the fabric out.

My intention had been to hack Simplicity 6107 and just add a collar. Unfortunately, and I'm not sure why, this didn't quite work. So instead, I only used the position of the darts from the commercial pattern and the rest was drafted by myself. I'm not sure, but I think that's how pattern blocks are used? Maybe I should get a block or something. Maybe I should find out what that actually is...


When all this was finally done I worked out my own layplan, took a deep breath, and started cutting out the fabric. The collar is the isosceles triangle on the fold, which was made by measuring from the centre back to where the button stand started. In future I would taper the collar more as it met the buttons, as this part caused me issues in the final fit. Due to intense paranoia, I put it all on the mannequin again before tackling sleeves or anything. I quite liked how it looked like this and decided to make my own sleeveless and collarless version in the same fabric once it was done!


I was happy, added the sleeves, tackled with the collar which was faced with heavyweight interfacing. I folded over a seam for it and kind of slotted it onto the neckline. Once the sleeves were added, my sister came home for a fitting and we decided to shorten them. I then drafted another heavily interfaced cuff to add to the sleeves, so that she could roll them up and still have the right side of the fabric showing. Like so...


Cuff down
Cuff 'rolled' up

All that was left after that was to add the adorable buttons and attach hooks and eyes to avoid the neckline being a bit sexier than intended. And this is it finished!


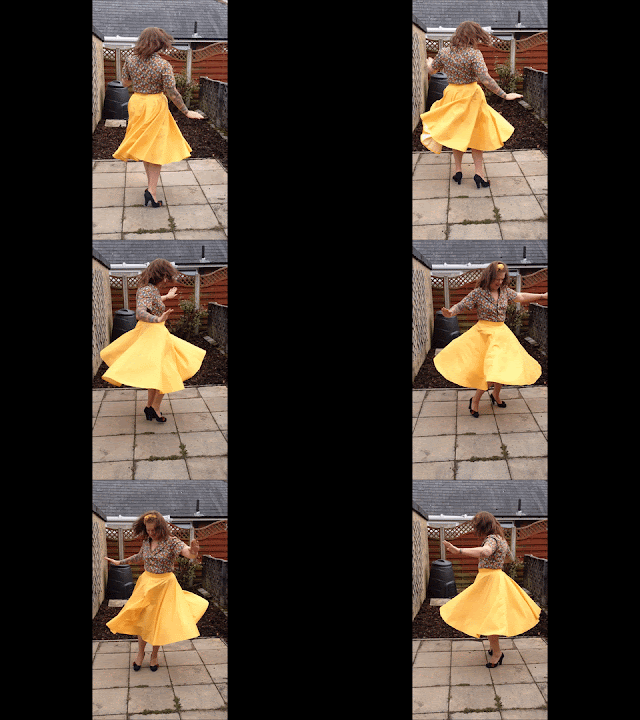
Teamed with the circle skirt I made first for the whole outfit the whole finish is simply stunning. The yellow of the skirt really draws out the shirt fabric and we have coordinating buttons on the shirt for the finish. I also made her a matching wired headband in the skirt fabric and we used the prettiest daisy button ever to be made to finish it.

"Look nonchalant"


The smile on her face made the stress worth it
Heather has ordered a petticoat online to add some oomph and flounce and other exciting words to the spin of her skirt.

Nearly two years ago I started sewing again, and in January 2015 I sat down and shouted at my first commercial dressmaking pattern in confusion and panic. I never thought back then that I'd still be dressmaking, never mind drafting and fitting a whole outfit to someone else. When it was finished and she put it on I was not only beaming with pride but also nearly tearful. This was the result of a lot of hard work and is proof of how far my skills have come. Dressmaker fo' life.

And if you read that little cheesy paragraph... here's your reward, because it's wrong to make a circle skirt and not do this...


I've also had a request on reddit to digitise and publish the pattern that I made for this shirt, so expect that on Etsy soon! (which, in teacher language, means October half term now...)

Til next time loves,

Katharine xxx

Sunday, 16 August 2015

Self-Drafted | The "Days of Yore" Skirt

A few weeks ago... or months ago, I forget, I hit the Fabbadashery with my boyfriend. It was only right that he experienced my happy place first hand. I think it's fair to say that he didn't really get it but did resolve to make a picnic blanket; out of checked cotton material straight from the bolt. So no sewing really, just buying a metre of fabric. He didn't buy it in the end when I threatened to teach him how to use a sewing machine.
ANYWAY, the darling that he is bought me a couple of metres of this beauty. In true Kat style I didn't have any plans for it but I'm damn chuffed with how it's turned out!


The fabric, for some reason, reminds me of that episode of Friends where Rachel buys a ton of furniture from Pottery Barn and convinces Phoebe that it's genuinely from "the days of Yore".

This skirt is 100% self drafted, no hacking at all. I started by measuring my waist, hips and the length from my waist to where I wanted it to end. I added four inches to my waist then divided that total by four to make the front and back skirt pattern pieces, one on a fold and one not. I also measured the distance between my waist and hips to make sure when I was drawing out the flare of the skirt it skimmed my hips nicely. I also made it three-ish longer at the back and curved the hem, which I'm also very happy with. Generally I'm just really happy about this skirt. I also added quite a wide waistband and a centre back zip. And here it is!!!
I look silly when I pose.
Totally not photoshopped to
make me look slimmer....
*ahem*


In all honesty, I'm immensely proud of how far my sewing and dressmaking skills have come, to think that six months ago I'd sat down with my first pattern and called for my mum for help, and now I am designing, drafting and creating my own clothes! What even.

Anyway, you know the drill guys, til next time...
Kat xx


Thursday, 6 August 2015

The Scottish English Rose Dress

Morning all! 

A few weeks ago, right after the great teaching interview marathon of 2015 I sat down to make the Simple Sew English Tea Dress. 
Now this pattern was a tad traditional for me, but when I was looking at all my patterns it was the one which fit my fabric the best. The fabric, a beautiful red floral by Rose and Hubble which I picked up in the Fabbadashery's summer sale at £3.99 a metre had called to me. It's a little more floral than I usually go for but was just too stunning to say no to. 
The pattern itself was the easiest one I've done so far, no mistakes whatsoever apart from doing my zip too low, but it was my second concealed zip so it's ok. 
I'd say in total with the hours I put in it only took my about 5 to complete this one, and fit wise it is the best yet! 
I chose the capped sleeve option. There were three sleeve options in the pack, two with additional cuff options, but I decided it would be a little too much with the already busy fabric. 

And so here it is! My sewing machine thread was tangled when I was doing the hem, so whatever you do, don't look at the inside stitching (that's if you ever see me!) but from the outside its neat and pretty and that's enough for me :) 


And there it is! There are rumours of a heatwave coming next week, which is good as I'm on annual leave, hopefully we get one more blast of heat so I can legitimately wear this, as I'm not sure how well it would go with black tights and boots. 

What's the easiest thing you've made yet? And what do you think of this creation? 
Remember to subscribe here and on bloglovin' if you enjoy my sporadic creations and I shall speak to you soon! 
Much love,
Kat xx

Tuesday, 19 May 2015

I Like to Wiggle Wiggle | Eliza M Pattern

Happy .... Tuesday, readers!
I recently took it upon myself after watching a little too much Mad Men to make myself a 1950's inspired wiggle dress. Basically so I could work towards looking like my girl crush...
Is there anyone more perfect?!
Enter my first Eliza M pattern. The one which I used was made specially for 'Love Sewing' magazine and was free with their October issue... The Eva Dress.
It works best with stretchy knit fabrics which I have been looking to experiment with, so this was the perfect time to try it out! I chose a gorgeous plum bengaline fabric with a two way stretch which was a DREAM to work with as it didn't fray or move around too much. As the pattern goes up to a size 20 I didn't have to add any inches either and was chuffed to find that I could have got away with a size 18 in the end.

The pattern itself is fairly easy to follow and well set out with helpful tips on how to manage the fabric and mark darts etc, which would be especially helpful for beginners! Unfortunately it is missing the step where you need to attach the facings, however a quick Google if you're unsure will solve this! It's completed with a 22" zip and a slit up the back. It's my new favourite work dress and one of my colleagues couldn't believe I made it myself!


As I was making this for myself at the same time as the one I made for my friend Katie it took quite a while. I had to tear myself away from it to focus on Katie's and as I was determined to finish it in time for my birthday weekend (I didn't) I made a few mistakes through rushing. But hey, what's a dress of mine without a few mistakes?!

I'd seriously recommend this pattern, no matter what your size. it's pretty clingy but it works (although I do feel more comfortable wearing them with super stomach holding in tights). So any size, it plays well to your curves and has a very womanly feel to it. I can't wait to dress it up with heels and tights with seams up the back for a night out!

I was GOING to post a picture of me in the dress, but as I tend to wear it to work and I leave the house like "a hurricane passing through" (as my mum so lovingly put) I never have time to post a picture of me head to toe in my wiggly creation. Which, in a sense is a blessing as I still don't look like Christina Hendricks :(

Til next time, it won't be so long... promise!

Kat xx

Sunday, 3 May 2015

The Katie Dress

Hiya lovely people!
Sorry I've been so rubbish with blogging lately, with work and actually finding time to sew I've been sleeping rather than blogging but that is about to change! With effect from today I will be posting a creation every Sunday without fail, and maybe a few extras during the week - stay tuned lovelies!

So, if you read my previous post you'll know that for the past two weeks I have been working on my first made to measure project for my friend Katie. What a challenge it was, but I really enjoyed it, even after all the long nights at the sewing machine and definitely will be doing it again! Though without such a tight deadline next time.

Anyway, Katie had been looking for a 1960's shift dress, a little like those pictured below, and so I got to work with some poorly drawn sketches pretending I knew what I was doing. I still had a long way to go...

Anyway, Katie chose some lovely nautical blue and white striped fabric from Minerva Crafts, however it turned out to be a little thinner and a bit more see through than we anticipated, which was actually a blessing, as it meant I could do all the fittings with the lining. It also meant I could learn how to line something!

So I went to Leeds Kirkgate Market to find some plain white lining material and whilst I was there picked up Simplicity pattern 1197, which I thought would be perfect. However, by the time I got it home I realised that the pattern was completely different, had a front panel which wasn't suitable for the striped pattern of the dress, so in the end I kind of had to wing it!

And so after taking her measurements... it began.


The lining fabric was a dream to work with, and I was particularly proud of how it turned out...


The next day Katie and I met at work and went to some unknown toilets in the building that I work in for the first fitting. Some people tried to visit the loo, don't they know that is my dressing room!

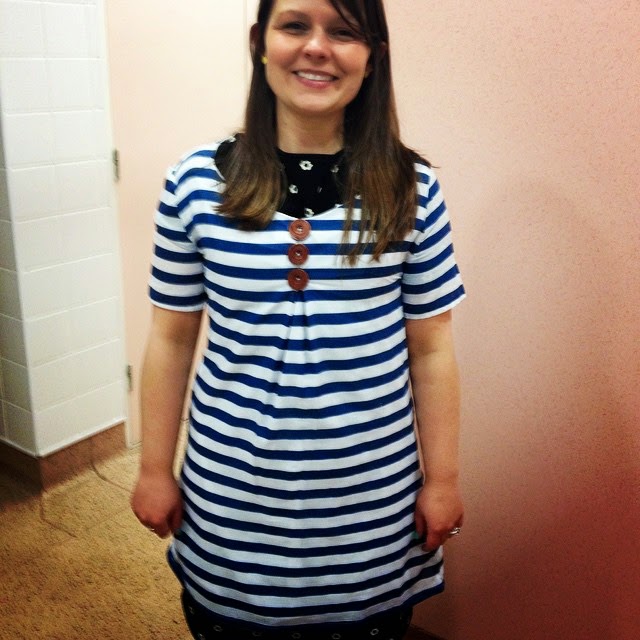
Sadly I was a tad generous with adding inches and the forgot how petite the lovely Katie is and so the dress ending up looking like a lab coat. But no matter, it's always easier to take in than take out. This is how it looked after pinning...

In total 4.5 inches were to come off, the sleeves to be cut down by 8.5 inches and 6 inches off the hem. After this I took the sleeves off, took it in at the side seams, the back, and then down the front to keep it in proportion and take in the shoulders. Everything fit for our next fitting and so I started on the outer fabric.

As it turned out, the fabric was much thinner than I anticipated and frayed very easily. But this is not yet an issue in this story...
I managed to finish it in 10 hours last Wednesday due to taking annual leave. I was shattered but immensely proud of finishing it before the Thursday deadline and showed all my colleagues with pride...


Unfortunately, when adding the lining to the outer it had eaten into my seam allowances and the perfect fit was no more. The bust was still too big and the skirt too narrow. The final deadline was the next day so I made it a mission that night to fix it. After a visit to my favourite Haberdashery and a brainstorming session with the owner I fixed the issues with the use of pleats.
It took 5 hours, and I finished at 1am, and then did some more on my commute the next morning, but it was done. Luckily I took some photos before I crashed out.


So it's far from perfect, the sleeves could do with some work and due to the fragility of the material the seams are frayed to unpicking and picking, but it's done. In a way I feel like it was a blessing in disguise as I think the buttons add a certain something to it. The additional pleat at the back was a good call too as the side seams just couldn't be taken out much more.

I don't think I've done a bad job though for my first piece... I mean, look at this pattern matching...
It's a bit off but come on! For a first timer that's pretty awesome.

At the end of it all, Katie was smiling, she's wearing it over another dress but that makes the fit even better. She can't currently lift her arms all the way over her head as I need to take the sleeves and the armholes a little further out, but it zips and it fits!

And due to me hoping to make a business out of this (one day...!) I even made a little tag...


So there it is, my first made to measure project, the first of many more I hope! Please let me know what you think and any tips or comments you may have and until next time folks!

Don't forget to follow me if you like my stuff, I'm on Bloglovin' too, and share this with any fellow crafty friends!

Til next time, Kat xx