Showing posts with label self drafted. Show all posts

Saturday, 24 September 2016

How to Make a Circle Skirt | Free Tutorial


Afternoon all! I hope you've all had a lovely week! As promised, here is part two of my circle skirt tutorial. If you have not yet drafted your pattern and want to make this, go here and follow my tutorial. Once you've done this you're more than welcome back into the loving sewing embrace of this tutorial. (That was an odd sentence...) 

What You Will Need

  • 3m - 4m of 45" width fabric, or 2m - 3m of 60" width fabric. (I'd go with a medium weight cotton, and steer clear of stretchy fabrics)
  • 20cm zip
  • A hook and eye (optional, and dependent on your zipper skills)
  • Corresponding thread
  • 1m of medium to heavy weight fusible interfacing
  • Pattern pieces from previous tutorial


Let's just remind ourselves what we ended up with after we made our pattern pieces:
We have piece 1, which needs to be cut on the fold; pieces 2 and 3 which are cut from the same pattern piece, and the waistband which is also cut on the fold.

Layplan and Cutting
1. How you devise your layplan depends on what the width of the fabric is. My sister's circle skirt was 45" width, and so the layplan looked like this. 45" width fabric is more common when it's the pretty patterns you're likely to want to use for a circle skirt, so hopefully this helps!
The waistband got cut from a length of scrap after this. Whether or not this works for you depends on your waist size and the length of the skirt, so you may have to alter things if it's not fitting.


However, the one I made for this tutorial was 60" width and I had 2.5m of it, which actually made life less complicated (and more economical).I folded it in half length ways so that piece one could be cut on the fold, and piece two could be pinned and cut to produce two pieces of fabric. Like so:


Cut all the pieces out (my favourite bit!) and you're ready to sew!

Sewing the Skirt

1. Sew the front skirt to the back skirt pieces at the side seams with a 1.5cm seam allowance. I sewed my skirt and my sister's using French seams, which gives it a nicer finish but it isn't necessary! Leave the centre back seam unstitched at this point.


Press open the seams on each side.

2. Affix the fusible interfacing to your waistband. My mum calls this iron on Vilene. Resist the urge to sing Iron-On Vilene to the tune of 'Come on Eileen'.


Step 3
3. Along the length of your waistband, fold up and press 1cm from the edges, like you're hemming it. Do the same on the other side. Now fold the waistband in half along the width and press, so each hem is meeting.

4. Fold the waistband again gently lengthways and give it a wee press to find the centre. Match the centre of the waistband up with the centre fold of the front skirt, right sides together, and pin from the centre to each end of the waist of the skirt.


Step 4
Step 4


5. Now, stitch the waistband onto the skirt right sides together along the pressed fold line. Take this slowly and steadily, as waistbands are a pain to take out and redo if they're wobbly.


6. Press seam up towards the rest of the waistband (I originally wrote wardrobe, brain fart...).


7. So, this was the first circle skirt I made where I inserted zip before I finished the waistband. I was a bit sceptical but thought it might eliminate some difficulties I've had with zips before, and to my delight it did! It's the best zip insertion for me yet and I am so happy it was on a skirt I was making for someone else!

Place the zip where you want it and then mark where the end of the zip is onto the centre back seam. Once this is done you want to sew the centre back seam from the hem up to this mark using a 1.5cm seam allowance. Once this seam is stitched you can start inserting your zip.

Insert the zip with the top of the zipper tape just going past the fold of the waistband. This way it'll be sewn to the very top of the waistband and you won't actually need the hook and eye. If you find you've done it too low though and there's a gap at the top then just pop a hook and eye on and it won't make a great deal of difference.


Tack your zip first in different coloured thread so that you can easily take these stitches out once the machine stitches are done. 
 My only tip for zips is to tack them first, for all other advice with them go to YouTube or give it a Google, as they rarely go so well for me!

8. Now, with the zip in fold the waistband over so that it meets your first waistband seam and hides it. Pin it in place.


 Now, top stitch the waistband in place, either along the first seam so no stitches are visible or as a neat top stitch about half a centimetre from the bottom of the waistband. I did the latter on this skirt and as it's level all the way along it has a nice effect!


Hemming

Hemming a circle skirt is notoriously difficult as the whole hem is on a curve and tricky to make the same length all the way around. In order to do this correctly I have tried many things, I've put it on Matilda the mannequin and measured and pinned meticulously for hours all the way around; my mum and I have fashioned together a sewing plumb line out of a box of staples and a scrap of fabric (doesn't work); I've laid down on the floor and looked right up the skirt with a spirit level. Finally, the most simple technique worked. I make life difficult for myself.

Get out your ironing board and rotate the skirt around, measuring the desired length from the waistband to the hem all the way round, plus 1cm for the hem. Work round, marking as you go, then go round again folding, pressing and pinning the hem in place, making tiny snips into the hemming allowance to reduce the bulk.


THEN! GET A HEMMING FOOT! This was the first time I'd ever used mine and it made a beautifully level hem that didn't gather or anything. Seriously, I was blown away! Keep to a 1-1.5cm hem, as too thick a hem will affect the way it hangs.


And with that, you're done! I add in this little label to the things I make for other people, until I get Sew Well Travelled ones made that is.


If you use this tutorial to make your own circle skirt please send me pictures on my social media profiles, which are linked at the top of the blog. OR, if you really don't want to make your own, visit my Etsy shop where you can commission me to make one for you (for a very good deal, taking into account the cost of fabric and the time it takes!)

Let me know how you get on, and until next time lovelies!

Kat xx

Wednesday, 31 August 2016

The 1950s Pattern Challenge


Sometimes there just isn't the perfect pattern for what you have in mind, that's what myself and my beautiful sister found anyway. As mentioned in my previous post, she had come home with an idea in mind of the shirt and skirt ensemble that she wanted and challenged me to create it for her. As you will have seen in my last post, pattern drafting/hacking was completely new to me and I sat staring at the 'pattern drafting paper' (I'm too stingy for the real stuff, so use greaseproof instead) for probably several hours in total. I created my own instructions and I pinned and tucked on a mannequin for quite some time before I even got up the guts to cut the fabric out.

My intention had been to hack Simplicity 6107 and just add a collar. Unfortunately, and I'm not sure why, this didn't quite work. So instead, I only used the position of the darts from the commercial pattern and the rest was drafted by myself. I'm not sure, but I think that's how pattern blocks are used? Maybe I should get a block or something. Maybe I should find out what that actually is...


When all this was finally done I worked out my own layplan, took a deep breath, and started cutting out the fabric. The collar is the isosceles triangle on the fold, which was made by measuring from the centre back to where the button stand started. In future I would taper the collar more as it met the buttons, as this part caused me issues in the final fit. Due to intense paranoia, I put it all on the mannequin again before tackling sleeves or anything. I quite liked how it looked like this and decided to make my own sleeveless and collarless version in the same fabric once it was done!


I was happy, added the sleeves, tackled with the collar which was faced with heavyweight interfacing. I folded over a seam for it and kind of slotted it onto the neckline. Once the sleeves were added, my sister came home for a fitting and we decided to shorten them. I then drafted another heavily interfaced cuff to add to the sleeves, so that she could roll them up and still have the right side of the fabric showing. Like so...


Cuff down
Cuff 'rolled' up

All that was left after that was to add the adorable buttons and attach hooks and eyes to avoid the neckline being a bit sexier than intended. And this is it finished!


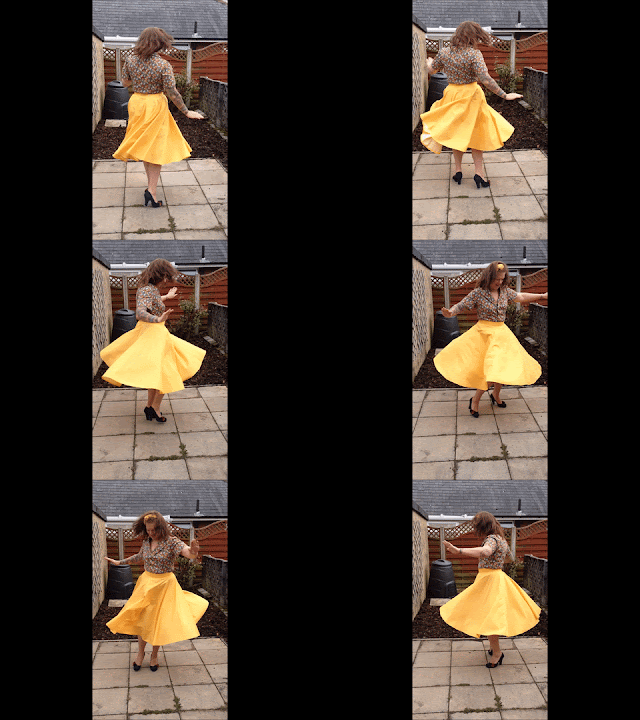
Teamed with the circle skirt I made first for the whole outfit the whole finish is simply stunning. The yellow of the skirt really draws out the shirt fabric and we have coordinating buttons on the shirt for the finish. I also made her a matching wired headband in the skirt fabric and we used the prettiest daisy button ever to be made to finish it.

"Look nonchalant"


The smile on her face made the stress worth it
Heather has ordered a petticoat online to add some oomph and flounce and other exciting words to the spin of her skirt.

Nearly two years ago I started sewing again, and in January 2015 I sat down and shouted at my first commercial dressmaking pattern in confusion and panic. I never thought back then that I'd still be dressmaking, never mind drafting and fitting a whole outfit to someone else. When it was finished and she put it on I was not only beaming with pride but also nearly tearful. This was the result of a lot of hard work and is proof of how far my skills have come. Dressmaker fo' life.

And if you read that little cheesy paragraph... here's your reward, because it's wrong to make a circle skirt and not do this...


I've also had a request on reddit to digitise and publish the pattern that I made for this shirt, so expect that on Etsy soon! (which, in teacher language, means October half term now...)

Til next time loves,

Katharine xxx

Friday, 12 August 2016

Pattern Drafting by A Newbie

Afternoon all!

My sister recently came home all excited because she'd seen a beautiful outfit in the window of a shop in York called Bowler Vintage. However, she couldn't justify the cost of it and so decided that I could make it for less money (she clearly was never intending on paying labour costs!)
This is the outfit...


She wants the outfit on the front mannequin.

So we journeyed to our favourite fabric shop and she picked out some beautiful fabric for the top and skirt, saving £35 in the process. The skirt is your basic circle skirt which I am extremely proud of as I drafted it all myself (see previous blogpost) and it's turned out beautifully. I am extremely proud of the drape on it and keep looking at it in awe.


However, the shirt is proving to be a bit more difficult. Heather was confident that I could just hack a previous pattern rather than buy a commercial one for it, I am less confident about it.
I'm hacking Simplicity 6107 (B), pictured below, but as it has a yoke and I need to add a collar I am completely drafting in the dark with it all.

I am currently at this stage with it. I have copied the pattern pieces for all components, but need to add a collar, button stand and turn ups to the sleeves. I'm not at all sure if I'm doing it right and am absolutely terrified of actually cutting it out in case I ruin it. So I suppose what I'm asking is - HELP!!!! How do I do this? Would it be better to buy a commercial pattern? And does anyone know of the perfect pattern? I am desperate to make it but terrified too.


If you have any help you can share your wisdom in the comments on here or on social media using the buttons above!

Thanks, and lots of love,

Katharine

Thursday, 28 July 2016

The Matryoshka


Hello!
I am very excited to share my most recent creation with you all as this is something I am incredibly proud of. I have always wanted to make a circle skirt, but thought I'd need miles and miles of fabric to do it. Turns out, I managed to make one with only 2m of fabric!
The fabric, £5 a metre from Hobbycraft, consists of a series of different Russian Dolls. I have always loved Russian (Matryoshka) dolls since I was a child and fell in love with the fabric as soon as I saw it.

I decided to draft a pattern myself, and using the instructions from an old issue of Love Sewing created the pattern pieces for a circle skirt, adding a button down element to the front (yay, no zips!). So, I measured my waist and hips, and the length I wanted the skirt to be, I divided my waist by pi (pi, in a real life context, did you ever think you'd see the day?!) to find the radius and drew a right angled triangle with the sides the same length as my waist radius. From there, I curved the line between the two radius points to make the waist, and then extended the sides the make my skirt the desired length, and curved the line between the two points again. I copied this template to make two and added 8cm to one side for my button cover. 
I don't think the above makes the best sense, but once you start doing it you kind of see where you're going with it. 
So I did the cutting and somehow the way it was cut caused all the Russian dolls to face different directions all the way round, a very cool and almost trippy effect! 


I'm not sure you can tell that well from the above picture but the dolls kind of spin as you move round the skirt.

The skirt fastens with two buttons on the waistband and then has 7 down the front. Each button was covered in matching fabric (each with a different doll on!) and I fully mastered buttonholes with this project! I couldn't figure out how to make them with my machine so I just hand sewed them all, I also hand sewed the waistband as my machine had a hissy fit and I lost it!

The skirt was finished and ended up being 4 inches too big. I don't know how!!! So rather than taking out my beautifully sewn French seams I just moved the buttons, and I can continue to do this as my waist gets smaller. There will still be the same amount of fabric and spin, but just a better fit.

I have to say that I am incredibly proud of this project. Everything I usually make is rushed as I'm always eager to wear it, but this time I took my time and care with it. I was determined to make it Patrick Grant ready and my goodness it's made me even happier with it. I can't wait to wear it out with my beautiful new heels that I bought for graduation. The best thing about the skirt though? How it looks when I spin, I love it!


My next project is a full on 1950s outfit for my sister. Circle skirt and a shirt with a deep neckline and collar. 

Let me know what you think! Thanks for reading :)

Til next time, happy crafting!

Kat xx

Sunday, 29 May 2016

Half Term

Well hello there my fine wee corner of the internet, I'm back!

This year I have really had to prioritise things, which has meant that I have had to ignore my wonderful wee sewing club here at Sew Well Travelled, and for that I truly apologise. It is currently May half term and my school has two weeks off! Which means I am going to endeavour to do SOME sort of sewing/craft as well as plan the hell out of my LAST TWO WEEKS ON PLACEMENT!!!! That's right guys, I am officially on the home stretch, I made it through the stress that is the PGCE year and have many grey hairs to show for it.

The last few months have been very tough going, I am currently job hunting for September as well as working hard to maintain my grades to get a good pass at the end of all of this. On top of this, in April we bid a tearful goodbye to our wonderful 20 year old cat, Toyah (pictured below).


She was something else was our Toyah but she became severely ill and it was cruel to keep her for our own sakes when she was no longer enjoying life. My mum and I made a resolution to live cat-less for the first time in our lives and we lasted a week. Toyah was such a big part of our family that no one could ever replace her, but our new feline friend has softened the blow. 


His name is Murphy and he is the survivor of what seems like a severe cruelty case, as a result he has a gammy leg, no teeth on the left of his mouth and is extremely needy. Quite a lot for a four year old to deal with! He likes to help me plan my lessons by walking all over the keyboard when he's not getting enough attention.

Aside from my cat news that really is all that's been going on in my life aside from teaching. My current class are amazing characters and I am going to miss them a stupid amount when I leave at the end of June. I still don't have a job but I remain hopeful and tenacious with the process, yet right now I really am looking forward to relaxing a little this summer!

I've got a plan in mind for a top to make this half term using this fabric which I bought at the Sewing fair in Manchester last September.


It's going to be a semi self drafted strappy top, using a pattern from last year's Sewing Bee book. I hacked the pattern last summer to make the dress below and it worked out quite well! I'm thinking of breaking the rules and making the straps in a totally different fabric, just to make it a bit wilder! 


I really need to wear that dress again actually. As well as that I'm going to make a few wee bits and bobs and finally put them on Etsy with the aim to top up my ever diminishing student loan, stay tuned for a link on here! I have a huge stash of fabric that needs to be used up, my first placement class did enjoy choosing from it for their iPad cases at our craft club though!


Anyway, you'll definitely hear more from me this half term, but until then - Happy Sewing Crafters!

Katharine xx

Friday, 22 January 2016

A Foxy Tea Dress

Two posts in one night! (that last one was actually in this one but then I realised I'd rambled on so much that it needed it's own section)

A few weeks ago I finished my latest dress with this foxy ass fabric.


It's a very heavy cotton, almost like curtain material, and was about £5 a metre from the craft show I went to in September with my mum (read about it here). My current obsession seems to be foxes and I just couldn't resist.

I decided, because I like the fit of the last one I did so much, to make the English Tea Dress by SimpleSew again (see here), but this time sans sleeves. The problem is, however, that I started this dress in September, and because of PGCE insanity I only finished it in December. Which means the fit is completely off around my bust and my waist. I could fix it, but I'm bound to gain the weight again, and I really can't be arsed right now. So here it is:


To be completely honest with you all, because that's the best policy, I am not 100% happy with it, it hasn't been worn out yet as I am struggling to style it and it is much too big. When I get a chance I'm going to take it in but for now it's considered finished and hanging with the rest of my creations in the Sew Well Travelled wardrobe!

I'm off to HobbyCraft tomorrow with a voucher, so hopefully the next blog won't take too long!

Til next time,

Kat

Sunday, 16 August 2015

Self-Drafted | The "Days of Yore" Skirt

A few weeks ago... or months ago, I forget, I hit the Fabbadashery with my boyfriend. It was only right that he experienced my happy place first hand. I think it's fair to say that he didn't really get it but did resolve to make a picnic blanket; out of checked cotton material straight from the bolt. So no sewing really, just buying a metre of fabric. He didn't buy it in the end when I threatened to teach him how to use a sewing machine.
ANYWAY, the darling that he is bought me a couple of metres of this beauty. In true Kat style I didn't have any plans for it but I'm damn chuffed with how it's turned out!


The fabric, for some reason, reminds me of that episode of Friends where Rachel buys a ton of furniture from Pottery Barn and convinces Phoebe that it's genuinely from "the days of Yore".

This skirt is 100% self drafted, no hacking at all. I started by measuring my waist, hips and the length from my waist to where I wanted it to end. I added four inches to my waist then divided that total by four to make the front and back skirt pattern pieces, one on a fold and one not. I also measured the distance between my waist and hips to make sure when I was drawing out the flare of the skirt it skimmed my hips nicely. I also made it three-ish longer at the back and curved the hem, which I'm also very happy with. Generally I'm just really happy about this skirt. I also added quite a wide waistband and a centre back zip. And here it is!!!
I look silly when I pose.
Totally not photoshopped to
make me look slimmer....
*ahem*


In all honesty, I'm immensely proud of how far my sewing and dressmaking skills have come, to think that six months ago I'd sat down with my first pattern and called for my mum for help, and now I am designing, drafting and creating my own clothes! What even.

Anyway, you know the drill guys, til next time...
Kat xx


Monday, 23 March 2015

Not So Mellow, Yellow

Happy Monday all! Hope you've all had a lovely weekend and are feeling more enthusiastic about work than I am right now!

So I recently took a trip to my FAVOURITE haberdashery in the world (The Fabbadashery, Halifax) looking for some inspiration. As my bank account has been drained this month due to a number of factors I was planning on settling on a couple of fat quarters and going with that; but then I decided that this is what savings were for and I was in the mood for buying some happiness (Fabric is happiness)...
At the start of the month I had treated myself to the new Great British Sewing Bee book, mainly for the walkaway dress pattern, but also for the tips and to basically have a sewing bible. It was £25 from Waterstones and worth every penny.


So, as the Walkaway Dress requires FIVE metres of material (!!!) I decided to park that for a richer time and chose the Sleeveless Shell top as pictured below. This required 2 metres of cotton and half a metre of lightweight interfacing (a grand total of £12 for the whole top)


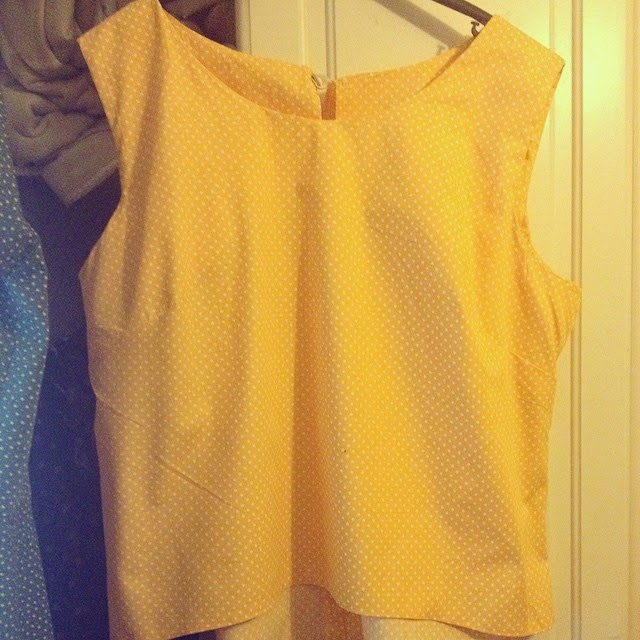
Sadly, I am not as slim as the girl in the photo. As a UK size 16/18 I tend not to go for tops like this in shops as they often don't fit my shape. (Slimmish waist, chocolate filled tummy.) But I took a leap and picked this yellow polka dot material. Yellow usually isn't my go to colour, but with spring coming and trying to get away from black and greys I took the chance and other than a few doubts during construction about it's yellowness I do really love it.


Once again, I didn't photograph the stages because I suck at this and was on a mission. Essentially though the pattern is simple to follow. It consists of front bodice, back bodice (which is in two pieces), the front facing and the back facing. There is also an option to make the back longer than the front which I went for, so it has more shape. The patterns which come with the book overlap each other so you need to trace them. Now before you go and spend a small fortune on dressmaking tracing paper to copy it, let me just say two little words... GREASEPROOF PAPER. My mum used it when she did a lot of dressmaking in the 70s, and it really is an amazing alternative. It's thick, easy to see through, doesn't tear and is £1 for 10 metres in PoundLand. I think if I ever design my own patterns I'll invest in some dressmaking paper, but for now this is a winner.

The pattern starts with sewing two darts at the bust, which took me three attempts to get them matching. You join the back bodice pieces to the front, and then join the two facing pieces together in the same way and hemming it. You then sew this to the neckline and understitch to ensure it doesn't flip up with wear (had to watch a YouTube video on how to understitch though...). The facing also goes down the sleeves. It is held together with ribbon and a button at the top of the back bodice and has a 1cm hem.

And this is the finished product! 


I'd say if you use a cotton with no stretch for it to add a few inches so it has a little give. I have an oddly long torso so it sits a little higher than it should, stopping just above the top of my jeans, so I've been wearing a vest top underneath to make it more wearable. 


This is not the most flattering photo I'll admit, but I can't model things without being silly. I also pretended to be a tram driver yesterday at Bradford Industrial Museum. I'm a natural, clearly.

I hope you enjoyed that and until next time my little sewing bees :) 

Kat xx